Fit Cortex Lab with GNU Radio using Docker: A Comprehensive Tutorial (1)
Greetings, fellow radio enthusiasts and experimenters! Today, I’m thrilled to guide you through an exciting tutorial on Fit Cortex Lab with GNU Radio using Docker. In this comprehensive guide, we’ll delve into the world of software-defined radio (SDR) and explore how Docker can enhance your SDR experiments. Furthermore, we’ll discover how to seamlessly integrate your projects into the Fit Cortex Lab testbed. So, let’s embark on this enlightening journey together.
Prerequisites
Before we dive into the tutorial, let’s ensure that you have the necessary tools and configurations in place. To follow along effectively, you’ll need:
- Docker Hub Account: Make sure you have an active Docker Hub account for image access.
- Docker App: Install the Docker application on your computer.
- Compatible X Server: Ensure you have a compatible X server installed, whether you’re using Linux, Windows, or macOS.
- Compatible Browser: Have a compatible web browser for the Bokeh GUI.
- Functional Docker Setup: Verify that Docker is working correctly on your computer.
These prerequisites are essential to get started with our tutorial.
Motivations and Introduction
Our journey begins with a look at why you should consider using Fit Cortex Lab for your SDR experiments. Fit Cortex Lab, short for “Future Internet of Things Cognitive Radio Testbed and Experimentation Lab,” is a cutting-edge facility that facilitates large-scale radio experimentation. Here are some compelling reasons to consider it:
-
Actual Hardware: Fit Cortex Lab offers access to real hardware, eliminating the need for you to possess specialized equipment for testing GNU Radio systems.
-
Reproducibility: Experiments in Fit Cortex Lab are 100% reproducible and repeatable. You’ll obtain consistent results across different runs.
-
Node Accessibility: Full access to the nodes allows you to connect, experiment, and develop without limitations.
-
Ease of Development: Developing for Fit Cortex Lab on any machine is now more accessible. You can use your existing setup without major changes.
-
User Management: The new WebApp includes a user management system that enables configuration changes to suit your needs.
-
Robots for Mobility: Operational robots are available for fully mobile experiments, providing flexibility and scalability.
-
Expansion: Fit Cortex Lab is continuously growing, with plans to install new USRPs and implement a reservation management system.
So, why should you choose Fit Cortex Lab? It’s a versatile tool that serves various purposes, including:
-
Learning GNU Radio: Fit Cortex Lab offers a platform to learn, practice, and teach GNU Radio without the need for dedicated hardware.
-
Reproducible Experiments: Experiments conducted in the lab are reproducible, thanks to its controlled electromagnetic environment.
-
Interference-Free Environment: The shielding of the lab ensures that your experiments won’t interfere with the outside world, allowing testing at various frequencies and power levels.
-
Large-Scale Networks: With numerous nodes available, you can test large-scale network configurations.
-
GPU Server: The lab features a powerful GPU server for CUDA-based GNU Radio or deep learning experiments.
Now that we understand the motivations behind using Fit Cortex Lab let’s explore what you’ll learn in this tutorial.
What You’ll Learn Today
In this tutorial, we’ll cover a range of topics, equipping you with valuable knowledge and skills:
-
Using GNU Radio with Docker: You’ll learn how to set up GNU Radio on your computer using a Docker image, regardless of your operating system (Windows, Linux, or macOS). This is a unique feature not often covered in tutorials.
-
Developing Fit Cortex Lab-Friendly GNU Radio Applications: Discover the best practices for developing GNU Radio applications that seamlessly integrate with Fit Cortex Lab.
-
Basic Fit Cortex Lab Usage: Learn how to connect to Fit Cortex Lab, reserve time slots, and submit tasks for execution.
-
Running Test Scenarios: Execute a test scenario within Fit Cortex Lab and monitor the results in real-time using the Bokeh GUI.
Now, let’s dive deeper into what Fit Cortex Lab entails and the hardware it offers.
Fit Cortex Lab: A Closer Look
Fit Cortex Lab is a state-of-the-art experimentation facility designed for exploring the Future Internet of Things and Cognitive Radio. Let’s break down its key features:
-
Nodes: Fit Cortex Lab boasts a total of 38 nodes, each comprising a Linux PC and an SDR. These nodes support various types of SDRs, including SISO SDRs and MIMO SDRs, all of which are compatible with GNU Radio.
-
High-End Equipment: The lab is equipped with high-end measurement and signal generation equipment that can be made available upon request.
-
Support Equipment: Timing and networking equipment like the octoclock are accessible for precise synchronization.
-
Robots: The lab features robots for mobility, providing a unique capability for conducting experiments in diverse environments.
-
SigFOX Base Station: A SigFOX base station is available for experiments involving low-power, wide-area IoT communication.
-
GPU Server: Fit Cortex Lab houses a powerful GPU server with two high-end graphics cards. This server is ideal for deep learning experiments, CUDA-based GNU Radio, and more.
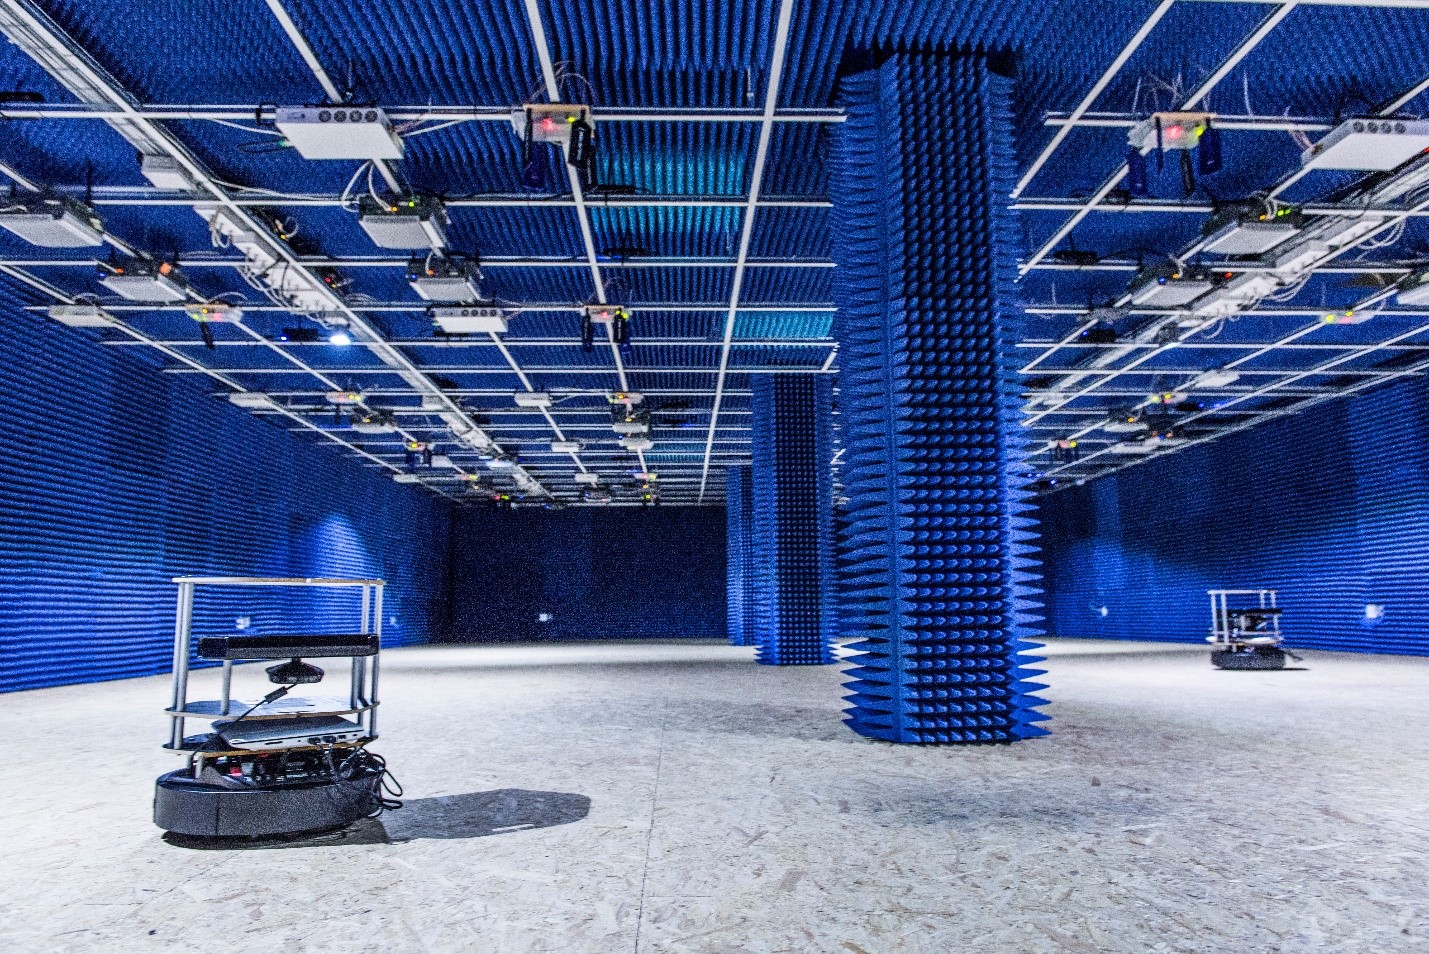
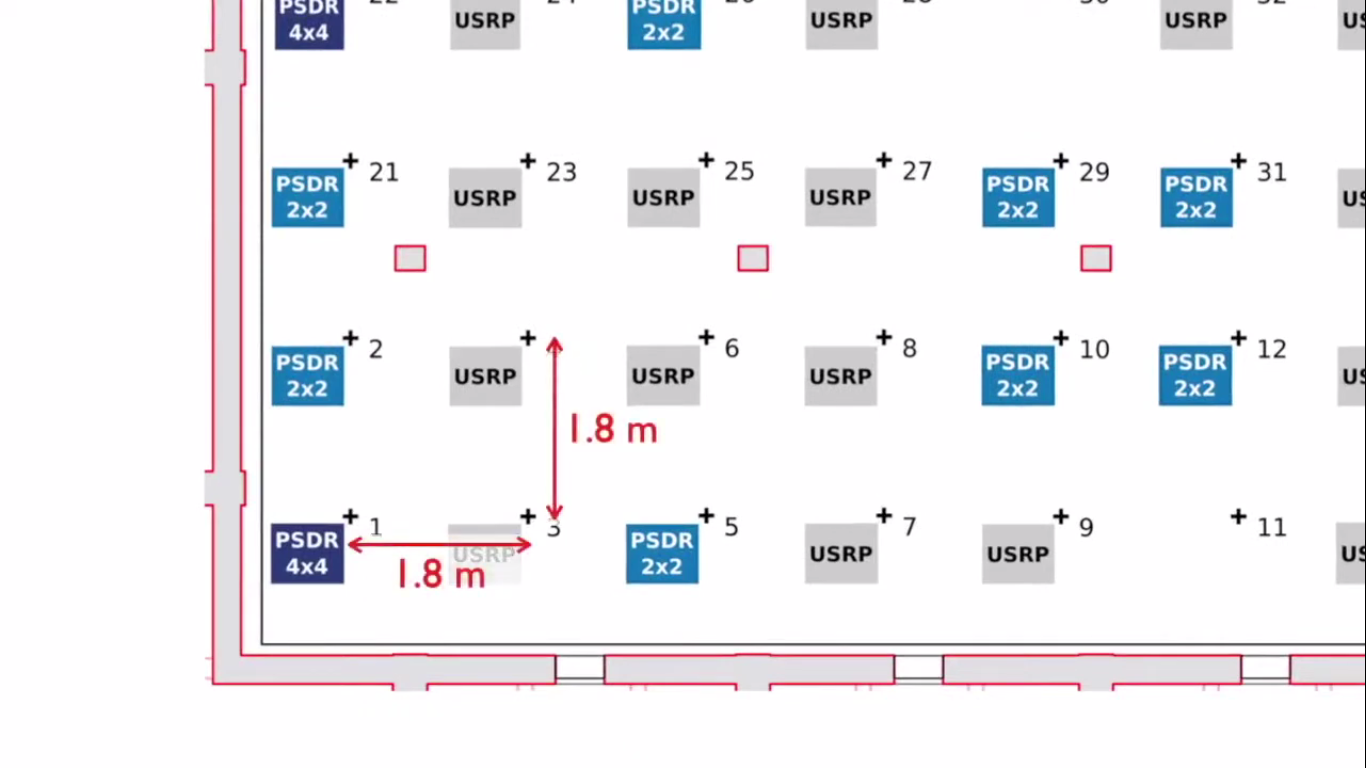
Here’s a visual representation of how SDRs are distributed within the Fit Cortex Lab experimentation room:
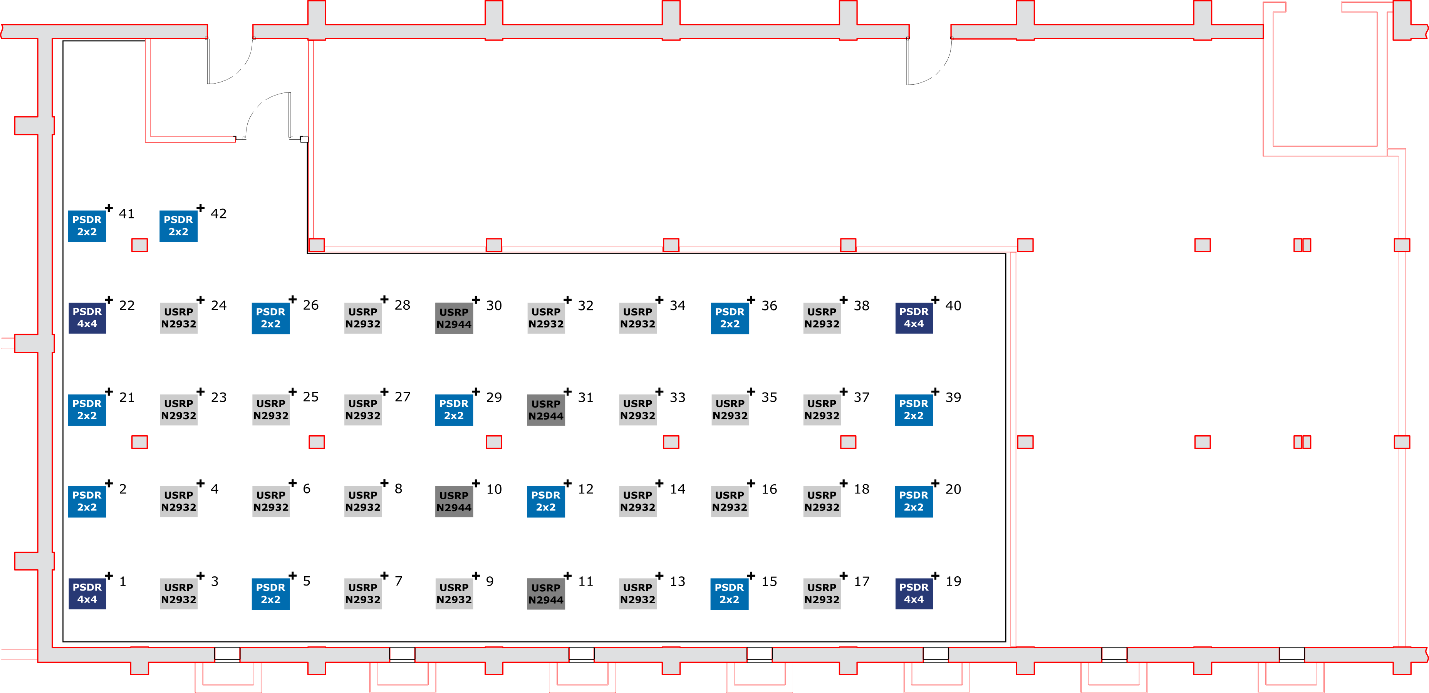
As you can see, both USRPs (in gray) and Pico SDRs (in blue) are strategically positioned in the room, with antennas spaced at 180 centimeters apart for various experiments.
For those interested in planning experiments, Fit Cortex Lab offers useful data on USRP TX and RX characterization. This data includes information on transmit power, path loss, and other essential parameters. You can refer to this detailed paper for further insights into planning your experiments effectively.
Using Fit Cortex Lab
Fit Cortex Lab offers two methods for usage:
-
Legacy Method: Users create Minus tasks, submit them, and Minus handles deployment and execution. However, users lack real-time control over the nodes.
-
Docker Method: This tutorial focuses on Docker, where Minus deploys Docker containers on nodes, enabling direct node access, GUI interaction, and greater flexibility.
Leveraging Docker for Fit Cortex Lab
One of the key aspects of this tutorial is the use of Docker in Fit Cortex Lab. Docker is a powerful containerization tool that simplifies the deployment and management of software and its dependencies. So, why should you choose Docker in Fit Cortex Lab?
Advantages of Docker in Fit Cortex Lab
-
Consistency: Docker ensures that your experiments are consistent across different machines, eliminating compatibility issues with various GNU Radio versions.
-
Direct Node Access: With Docker, you gain direct access to the Fit Cortex Lab nodes, allowing for greater flexibility and control over your experiments.
-
Simplified Software Deployment: Docker containers package software and dependencies independently of the host OS, simplifying the setup process.
-
Enhanced GUI Compatibility: Docker seamlessly integrates with graphical user interfaces (GUIs) like the Bokeh GUI, providing a smoother user experience.
In summary, Docker simplifies the GNU Radio setup, ensures cross-platform compatibility, and provides direct access to Fit Cortex Lab nodes, making it an ideal choice for SDR experimentation.
However, it’s worth noting that Bokeh GUI, a web-based graphical user interface for GNU Radio, is not included in the vanilla version of GNU Radio. Therefore, you need to install it manually. The installation process can be complex, which is why having a Docker image with Bokeh GUI pre-installed, as provided in this tutorial, is extremely beneficial.
Exploring Docker Images for Cortex Lab
Now, let’s delve into the practical aspects of preparing your computer to develop for Fit Cortex Lab. In this section, we will explore Docker images tailored for Cortex Lab usage.
Locating Fit Cortex Lab-Compatible Docker Images
If you’re searching for Fit Cortex Lab-compatible Docker images on Docker Hub, you should look for the string “cxlb”. This identifier is commonly used to tag Docker images designed for Cortex Lab. You’ll find images provided by three key contributors:
-
M. Lmber (Mathieu Lmber): Mathieu Lmber is one of the lead engineers at Cortex Lab and actively contributes to its development.
-
L. Cardozo (Leonardo Cardoso): Leonardo Cardoso is a contributor to Cortex Lab, associate professor at INSADO Lyon and researcher at INRIA.
-
Notou (Cyrille Morin): Cyrille Morin is a primary contributor to the deep learning images used in Cortex Lab and plays a significant role in maintaining the Bokeh GUI aspect of GNU Radio.
We also recommend that if you create your own Docker images for Fit Cortex Lab and intend to share them with the community, you should prepend their names with the string “cxlb”. This convention helps others easily identify images suitable for Cortex Lab.
Docker Interactive Session: Step by Step
Now, let’s begin our first interactive session in this tutorial. Please note that while we’ll provide guidance on Docker usage, teaching Docker comprehensively is beyond the scope of this tutorial. If you’re new to Docker, consider exploring dedicated resources to gain a deeper understanding. With that said, let’s proceed with the practical steps:
Step 1: Docker Image Pull
We assume you’ve already pulled the base Docker image as mentioned at the beginning of this tutorial. To verify that you have the image, open your Docker application, navigate to the “Images” section, and confirm that the base image is listed or run docker images in the terminal.
Step 2: Running the Docker Image in a Container
Next, we’ll run the Docker image in a new container on your local computer. Open your terminal and execute the following command:
docker run -dti -p 2222 --name="CorteXlab-tutorial" lcardoso/cxlb-gnuradio-3.8:1.1
This command starts a new Docker container from the specified image. It assigns the name “CorteXlab-tutorial” to the container and maps port 2222 to it.
Step 3: Connect to the Docker Container via SSH with X Window Export
Before proceeding, make sure your X server is running. This may vary based on your operating system:
- Linux: X server is typically running, so no additional setup is required.
- macOS: Use XQuartz, the default X window system.
- Windows: Install a compatible X server like VcXsrv.
Now, establish an SSH connection to the container using the following command:
ssh -Y -p 2222 root@localhost
This command connects to the container using SSH with X window export enabled. It will open a terminal within the container.
To check if the X window export is successful, enter the following command:
echo $DISPLAY
You should see something like “localhost:10.0,” indicating that the display environment within the container is correctly configured.
Step 4: Running GNU Radio Companion and Creating a Bokeh GUI Test
Now that you’re inside the container, you can run GNU Radio Companion (GRC) and create a Bokeh GUI test. In your terminal within the container, simply type:
gnuradio-companion
This command launches GRC within the container. You’ll notice a GRC window opening. Remember that this GRC instance is running inside the Docker container but is exported to your local machine.
For our test, let’s create a simple flowgraph. You can add blocks, such as waveform generators, noise sources, signal sources, and more, as needed. Connect these blocks to create your desired flowgraph. For example, you can follow these steps:
- Add a waveform generator, noise source, and signal source.
- Connect these blocks and configure them as required.
- Add a math operator block (e.g., an add block) to combine the signals.
- Add a throttle block to ensure smooth execution.
- Add a Bokeh GUI time sync block and configure its placement and options.
Remember to save your GRC file with a descriptive name.
Step 5: Running the Bokeh GUI Test
With your flowgraph created and saved, you can now run the Bokeh GUI test. Here’s how:
- Run your flowgraph within GRC.
- In the terminal within the container, look for a line indicating that your Bokeh GUI server is running, along with a URL. For example: “Bokeh app running at http://localhost:5006/bokehgui”.
However, note that you can’t directly access this URL from your local machine because the port is not exposed. To resolve this, you’ll need to set up port forwarding from the container to your host machine.
Port Forwarding: Accessing Bokeh GUI from Your Local Machine
To enable access to the Bokeh GUI from your local machine, follow these steps:
- Stop the flowgraph within GRC and close GRC.
- Exit the SSH connection to the container by typing
exitin the terminal.
Now, you’ll set up port forwarding using a modified SSH command. In your terminal on your local machine, enter the following command:
ssh -Y -p 2222 -L localhost:5006:localhost:5006 root@localhost
This command forwards port 5006 from the Docker container to your local machine. After executing this command, you’ll be back inside the container.
Now, rerun GRC and your Bokeh GUI test as previously instructed. If you encounter an error, try running it again.
To access the Bokeh GUI from your local browser, open your browser and enter the following URL:
http://localhost:5006/bokehgui?bokeh-session-id=test-bokeh
Your browser will connect to the Bokeh GUI application running within the Docker container. You should now see your Bokeh GUI interface, allowing you to interact with your flowgraph in real time.
Completing the Interactive Session
With the successful execution of all five steps, you’ve completed the first interactive session. You’ve learned how to set up Docker, run GNU Radio Companion, and interact with the Bokeh GUI, all within the context of Fit Cortex Lab.
Preparing for Fit Cortex Lab Development
Now that you’ve gained hands-on experience with Docker and Bokeh GUI in a local environment, it’s time to prepare for Fit Cortex Lab development. In the next interactive session, we’ll explore how to generate tests tailored for Fit Cortex Lab.
Step 1: Opening the rx_ofdm.grc File
To begin, open the rx_ofdm.grc file and save it to your home directory within the Docker container. Here are the steps:
- Open GNU Radio Companion.
- Click on “File” and select “Open.”
- Navigate to the path
cortexlab/toolchains/current/share/gnuradio/examples/digital/ofdm/to find therx_ofdm.grcfile. - Open the
rx_ofdm.grcfile.
Once opened, you should see a complex flowgraph with multiple blocks.
Step 2: Modifying the Flowgraph
In this step, we’ll modify the flowgraph to replace unnecessary parts with a UHD source. Follow these instructions:
- Select and delete the blocks that simulate an OFDM transmitter but are not needed for our purposes.
- In the right-hand toolbar, find the “UHD” category and add a “UHD Source” block to the canvas.
- Connect the “UHD Source” block to the “Schmidl and Cox” and “Delay” blocks as shown in the flowgraph.

rx_ofdm flowgraphStep 3: Configuring Main Options
Now, let’s configure the main options to use the Bokeh GUI. Follow these steps:
- Double-click on “Options” in the flowgraph.
- Change “No GUI” to “Bokeh GUI.”
- Save your changes.
Step 4: Adding Bokeh GUI Elements
We’ll add Bokeh GUI elements to help with real-time debugging in Fit Cortex Lab. Here’s how:
- Return to the flowgraph canvas.
- Make space for the Bokeh GUI elements.
- Go to the “Bokeh GUI” category.
- Add a “Frequency Sync” block and connect it directly to the “UHD Source” block.
- Double-click the “Frequency Sync” block and set its placement to
[1, 0, 1, 1]. - Add a “Bokeh GUI Slider” to adjust the gain of the “UHD Source.” Name it
rx_gainwith a range from 0 to 40 and a default value of 10. - Go to the “UHD Source” block, open its “RF Options,” and set the gain value to the variable
rx_gain.
Step 5: Saving and Generating Python Code
With the modifications in place, it’s time to save your changes and generate the Python code for the flowgraph. Follow these steps:
- Save your flowgraph with a meaningful name.
- Click the “Generate the flow graph” button in GRC. This will create a Python file, typically named
rxofdm.py, which corresponds to your flowgraph.
Congratulations! You’ve successfully prepared the flowgraph for Fit Cortex Lab development.
Conclusion
In this first part of our comprehensive Fit Cortex Lab with GNU Radio using Docker tutorial, you’ve learned about the motivations behind using Fit Cortex Lab, explored the features of the lab, and gained practical experience with Docker, GNU Radio Companion, and the Bokeh GUI in a local environment.
Additionally, you’ve prepared your computer for Fit Cortex Lab development by modifying a flowgraph, configuring Bokeh GUI elements, and generating Python code.
In the next part of the tutorial, we’ll delve deeper into Fit Cortex Lab, covering topics such as reserving nodes, submitting tasks, and running experiments on the actual hardware. We’ll also explore advanced use cases and techniques for harnessing the power of Fit Cortex Lab for your SDR experiments.
Stay tuned for the next installment of this tutorial, where we’ll take our Fit Cortex Lab journey to the next level!